Cali
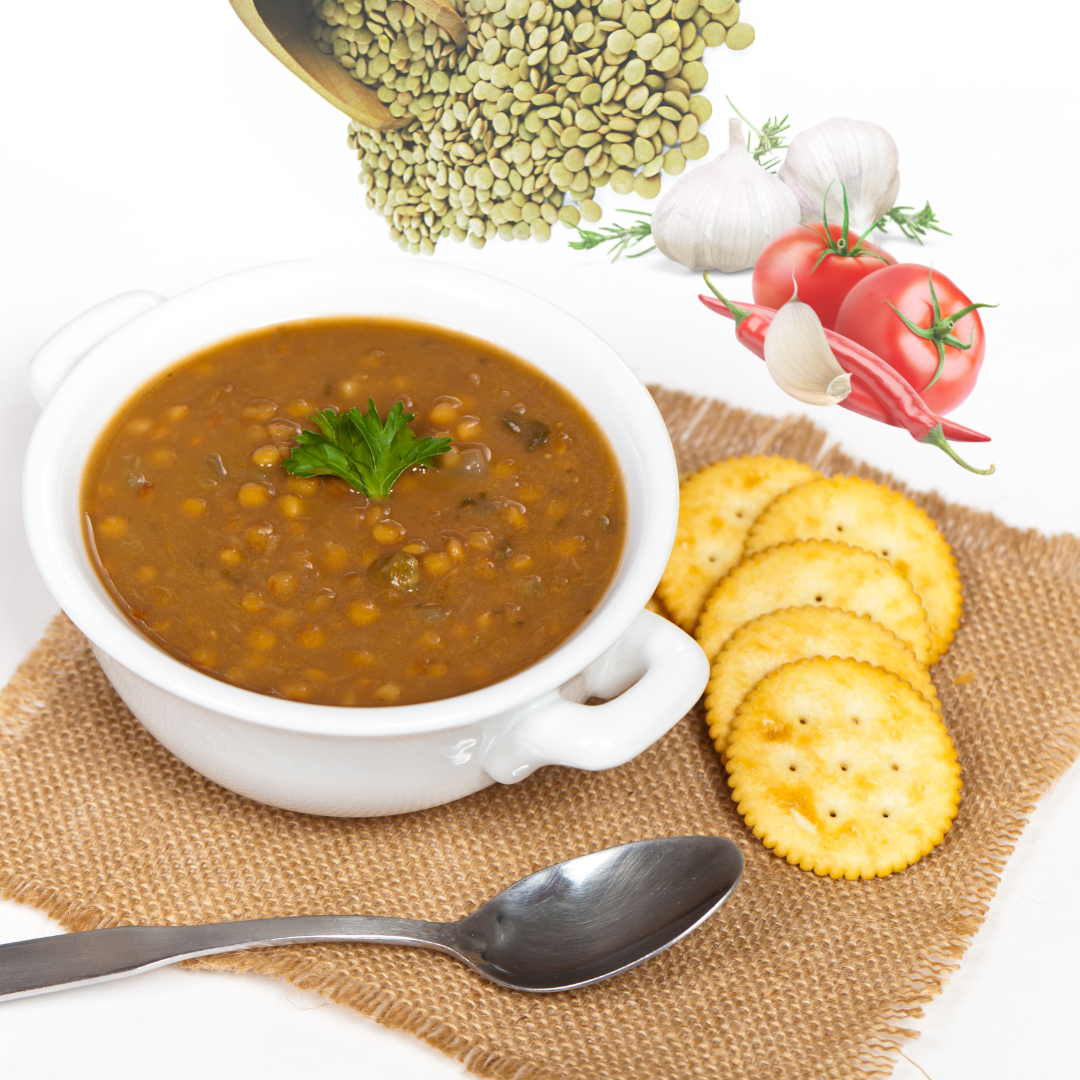
Cali“Indulge in the ultimate comfort with our irresistibly delicious lentil soup! Packed with hearty flavors and wholesome ingredients, this nourishing dish is sure to warm your soul and leave you craving more.”
Upgrade your Lentil Soup game with our irresistible recipe! Say goodbye to blandness and hello to a dish that’ll have everyone clamoring for seconds… and thirds! Whether you choose green, red, brown lentils, or a mix, this nourishing yet simple recipe guarantees 100% deliciousness.
What is Lentil Soup?
Lentil soup is a hearty and nutritious soup made primarily from lentils, which are small legumes known for their high protein and fiber content. Lentil soup is popular worldwide and is valued for its delicious taste, affordability, and health benefits.
Infused with just the right blend of spices, bay leaves, and a hint of lemon, our Lentil Soup transcends the ordinary. It’s an effortless creation that consistently wows, earning rave reviews and five-star ratings from satisfied readers! For more delicious soups, try my Broccoli soup and Celery soup.nd health benefits.
Now, let’s talk about Lentil Soup. Sure, it might not sound like the most exciting option out there, but trust us, this soup is a game-changer! Even for those of us who usually crave bold flavors, this dish is impossible to resist. Prepare to find yourself reaching for seconds, thirds, and even packing leftovers for tomorrow’s lunch—it’s that good.
And let’s not forget the health benefits! Lentils are a powerhouse of nutrition—packed with minerals, protein, and fiber while being low in fat and calories. Plus, their slow-burning carbs keep you feeling satisfied for longer, making them a win-win for your taste buds and your health.
So, what’s the secret to our Lentil Soup’s undeniable deliciousness?
It’s all about the little touches. From the slow-cooked onions, garlic, spices, and herbs that create a flavor base like no other to the surprising twist of fresh lemon juice.
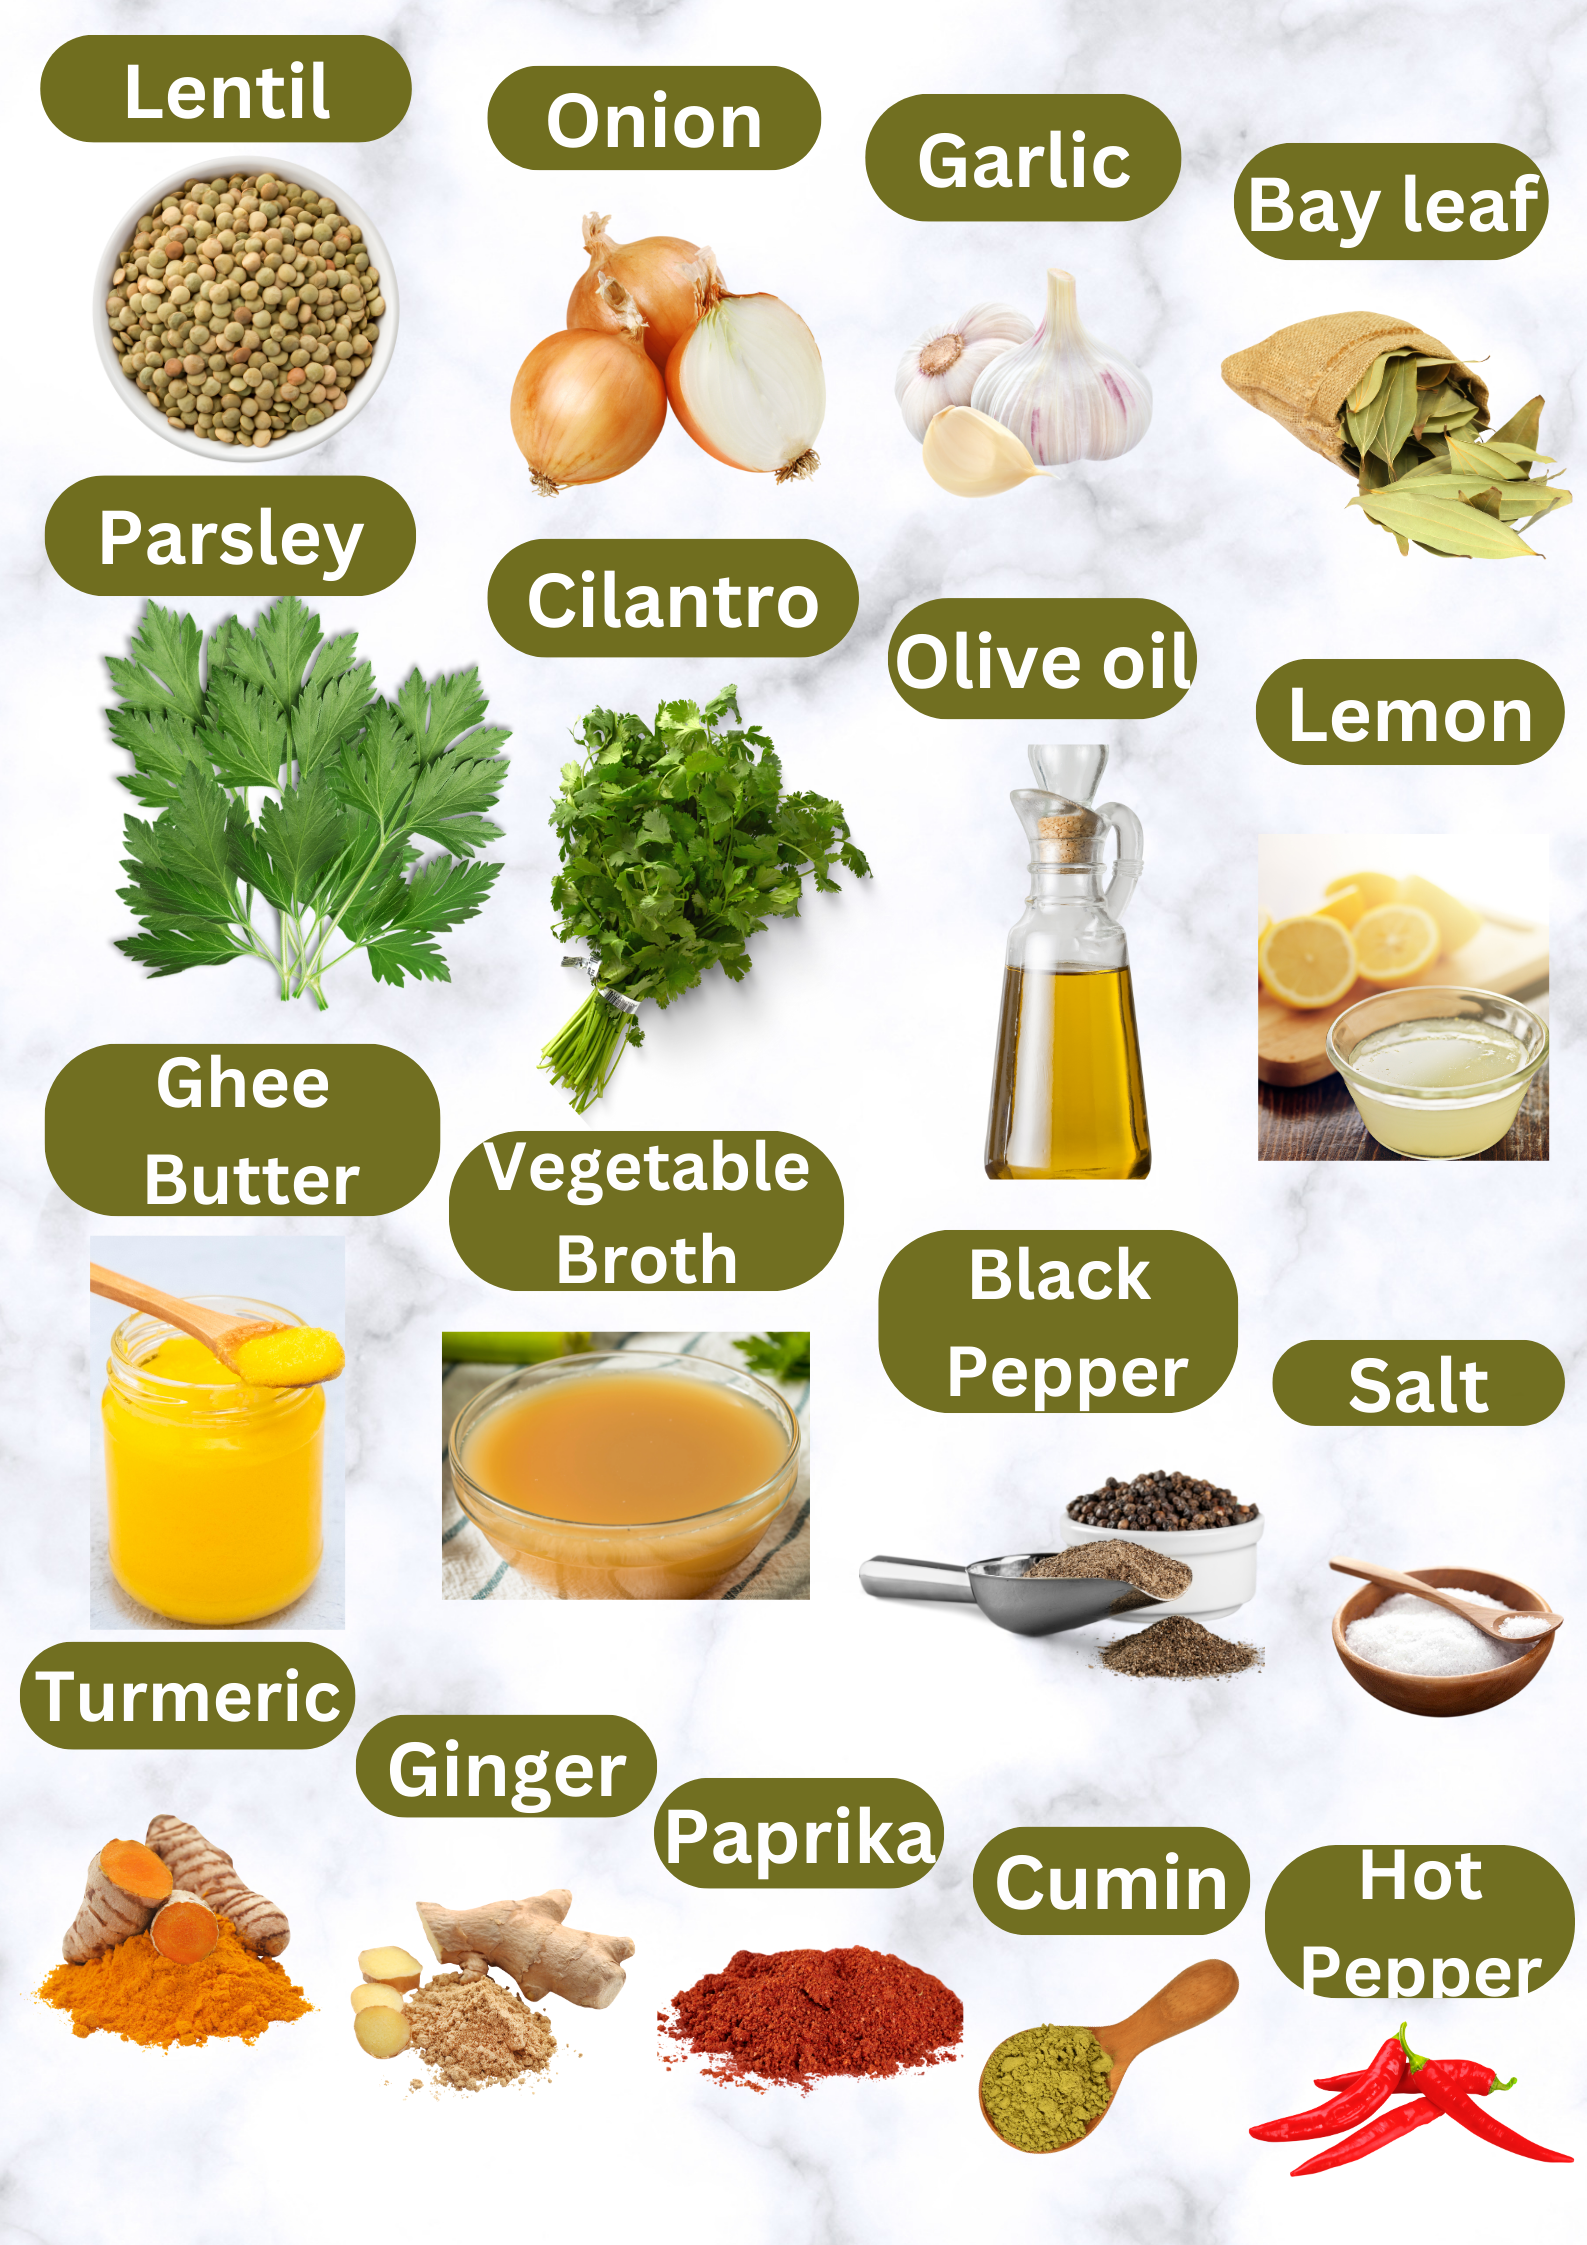
What you will need to make Lentil Soup
- Ghee Butter: It adds creamy and delicious taste to the soup.
-
Olive Oil: It adds a subtle flavor.
- Green French Lentil: It has peppery flavor and hearty texture; it holds shape while cooking.
Pro Tips for Perfecting Your Lentil Soup
-
Choose the Right Lentils: Different types of lentils offer varying textures and flavors. Opt for green or brown lentils for a firmer texture, while red lentils tend to break down more, creating a smoother consistency. Experiment with different varieties to find your favorite!
-
Pre-Soak for Even Cooking: If using whole lentils, consider soaking them for a few hours or overnight before cooking. This can help reduce cooking time and ensure more even cooking, resulting in a creamy and well-developed soup.
-
Layer Flavors: Build depth of flavor by sautéing aromatic vegetables like onions, garlic, in butter before adding the lentils and liquid. This step caramelizes the vegetables, enhancing their natural sweetness and adding complexity to the soup.
-
Balance with Acid: A splash of acid, such as lemon juice or vinegar, can brighten the flavors of lentil soup and add a refreshing contrast. Add it towards the end of cooking to prevent the lentils from becoming too acidic.
-
Texture Matters: For a thicker soup, blend a portion of the cooked lentils with an immersion blender before serving. Alternatively, mash some of the lentils against the side of the pot with a spoon for a chunkier texture. Adjust the consistency to your preference by adding more broth or water as needed.
-
Finish with Freshness: Just before serving, stir in fresh herbs like parsley, cilantro, or dill to add brightness and freshness to the soup. A drizzle of olive oil can also provide a luxurious finishing touch.
-
Experiment with Toppings: Get creative with toppings to add texture and flavor to your lentil soup. Try crunchy croutons, a sprinkle of grated cheese, a swirl of pesto, or a spoonful of creamy coconut milk for a dairy-free option.
-
Meal Prep and Freeze: Lentil soup makes for excellent meal prep and freezer-friendly meals. Double or triple the recipe to have extra portions on hand for busy days. Store leftovers in airtight containers in the fridge for up to 4 days or freeze for longer storage.
How to make Lentil Soup
Step 1- Remove all debris or small stones from the dried lentils, the organic lentils come cleaner with less stones than the regular non-organic. Add the lentils to a bowl, pour boiling hot water to cover 2/3 above the lentils and leave it soaking for at least two hours, four hours is ideal.
Step 2- With your hand rub the lentils in the same water and flip them over until all the foam raise up to the top. Transfer the lentils to a strainer and wash three to four times under running water until the water comes out clean. This step is important to reduce the bloating associated with legumes and beans.

Frequently Asked Questions
How long does lentil soup last in the refrigerator?
Lentil soup can typically be stored in the refrigerator for up to 4 to 5 days in an airtight container.
Can I freeze lentil soup?
Yes, lentil soup freezes well. Store it in freezer-safe containers or bags for up to 3 months. Thaw overnight in the refrigerator before reheating.
Are lentils gluten-free?
Yes, lentils are naturally gluten-free, making lentil soup a suitable option for those with gluten sensitivities or celiac disease.
How do I thicken lentil soup?
Lentil soup naturally thickens as it cooks due to the starch released from the lentils. However, if you prefer a thicker consistency, you can blend a portion of the soup with an immersion blender or mash some of the lentils with a spoon.
Can I use different types of lentils in lentil soup?
Yes, you can use various types of lentils in lentil soup, such as green, brown, red, or French lentils. Each type offers a slightly different texture and flavor, so feel free to experiment to find your favorite.
How do I prevent lentil soup from becoming mushy?
To prevent lentil soup from becoming mushy, avoid overcooking the lentils. Cook them just until they are tender but still hold their shape. Additionally, refrain from stirring the soup too vigorously, as this can cause the lentils to break down further.
Can I make lentil soup in a slow cooker or Instant Pot?
Yes, lentil soup can be made in a slow cooker or Instant Pot for added convenience. Follow the manufacturer’s instructions for cooking times and settings.
Is lentil soup vegetarian/vegan-friendly?
Yes, lentil soup is naturally vegetarian and can easily be made vegan-friendly by using vegetable broth instead of chicken broth and omitting any dairy-based ingredients.
Are lentils healthy?
Yes, lentils are highly nutritious and packed with protein, fiber, vitamins, and minerals. They are also low in fat and cholesterol, making them a healthy addition to any diet.
Can I customize lentil soup with additional ingredients?
Absolutely! Lentil soup is highly versatile and can be customized with a variety of ingredients such as vegetables, herbs, spices, and proteins like sausage or bacon to suit your taste preferences.
Nutrition Facts
Servings 4
- Amount Per Serving
- Calories 300kcal


Delicious Vegetarian Lentil Soup
Description
Discover the ultimate comfort food with our hearty lentil soup recipe! Packed with flavor and nutritious ingredients, this satisfying dish is a must-try for food enthusiasts. Dive into a bowl of warmth and goodness today!
Ingredients
Instructions
- in a bowl, add lentils and boiling hot water. Set aside for at least four hours, this way the lentils will not fall apart during the cooking process.
- In a medium pot, add the lentils and olive oil.
- Add the grated onion, garlic, carrot, diced parsley, and cilantro. Stir all ingredients until combined.
- Add the water or vegetable broth to cover the lentils. Cook on a low to medium heat for 25 minutes.
- Uncover and check if the lentils are cooked.
- Add the cumin, 1/4 cup olive oil and the lemon juice. Stir and serve hot.
Nutrition Facts