The Ultimate Gluten-Free Lemon Tart Recipe that Will Wow Your Taste Buds
Hello and Welcome back Palette Pioneers! Are you ready to take your baking to the next level? This gluten-free lemon tart recipe is a game-changer. It transforms simple ingredients into a refreshing dessert that’s perfect for any occasion. Whether you’re a seasoned baker or just starting out, this tart is easy to make and guaranteed to impress.
In this post, we’ll explore the step-by-step process of making a delicious gluten-free lemon tart. You’ll learn about the ingredients, why we chose a crumb crust, and some interesting facts about lemon tarts. Plus, we’ll share tips on how to perfect this dessert every time.

What is a Gluten-Free Lemon Tart?
A lemon tart is a classic dessert known for its tangy and sweet flavor. Our version is gluten-free, making it accessible to everyone. The tart is composed of three layers:
- Graham Cracker Crust: A base made from gluten-free graham crackers and butter.
- Lemon Custard Layer: A creamy filling made with condensed milk, heavy whipping cream, and fresh lemon juice.
- Lemon Jell-O Topping: A layer of Lemon Jell-O that adds a beautiful finish and an extra burst of lemon flavor.
Benefits of Making a Gluten-Free Lemon Tart
Why choose a gluten-free lemon tart? Here are some benefits:
- Inclusivity: Perfect for those with gluten sensitivities or celiac disease.
- Simplicity: Uses easily accessible ingredients, some of which you might already have in your pantry.
- Flavor: Combines the refreshing taste of lemon with a creamy texture and a crunchy crust.
Key Ingredients for Our Lemon Tart
Here’s what you need to create this delightful dessert:
- Gluten-Free Graham Crackers: Look for brands like Pamela’s, Kinnikinnick, Nairn’s, or Annie’s. These can be found online if not available at your local store.
- Butter: Any stick of butter will do.
- Condensed Milk: Sweetened condensed milk provides the creamy texture and sweetness.
- Heavy Whipping Cream: Adds richness to the custard layer.
- Lemon Juice: Freshly squeezed is best, but bottled works in a pinch. Meyer lemons are a great choice if available.
- Lemon Jell-O: Adds a final touch of lemon flavor and helps the tart set properly.
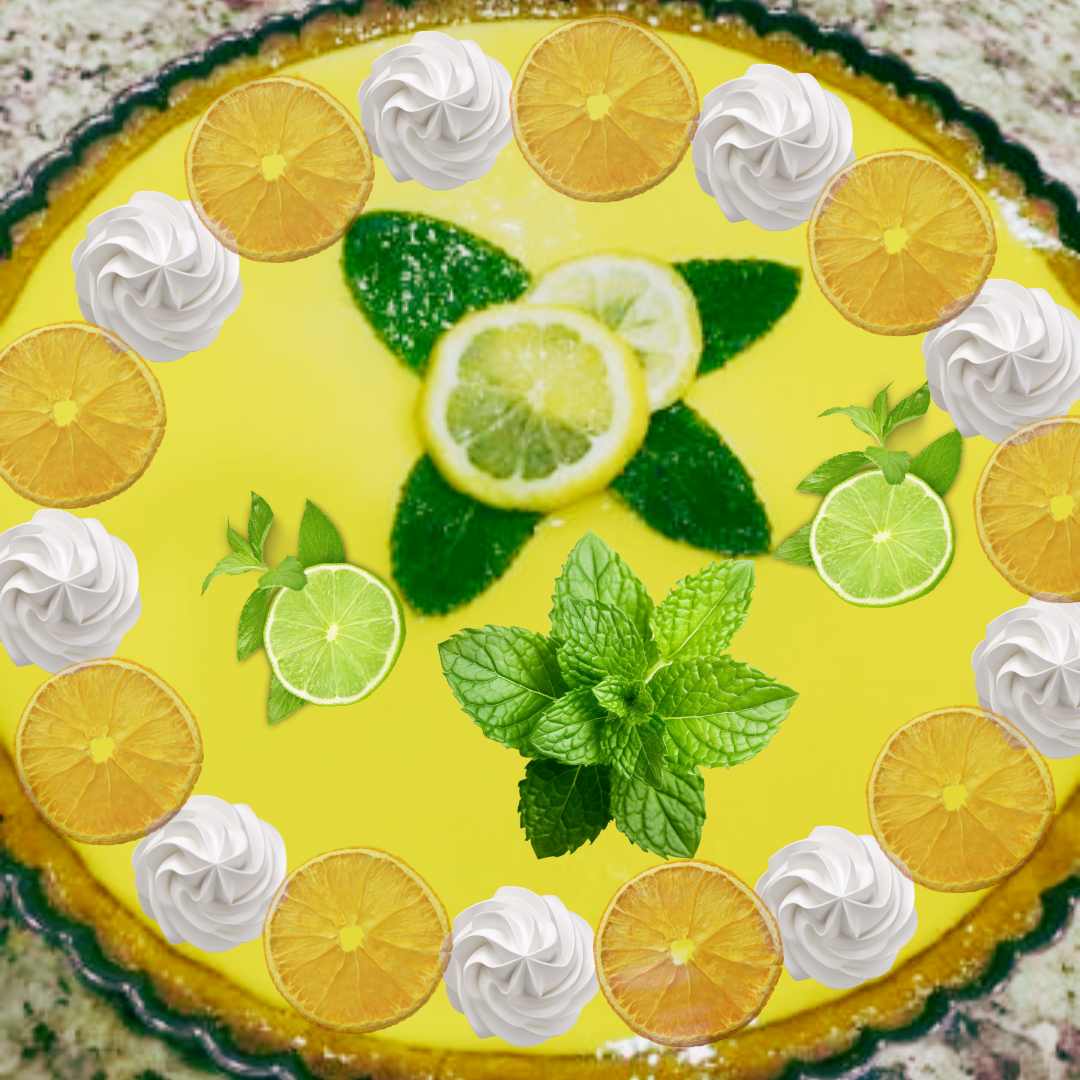
- Mint Leaves and Lemon Slices: For decoration, but optional.
- Lemon Slices: As with the lemons for juicing, the higher the quality, the better the flavor.
Why Use Lemon Jell-O?
Gelatin has long been used in desserts for its ability to set and hold shapes. Lemon Jell-O enhances the tart’s flavor while providing a distinct textural contrast. It’s also visually pleasing and helps the tart maintain its form when sliced.
Choosing the Right Crust
Graham Cracker vs. Pastry Crust
When deciding between a graham cracker or pastry crust, consider the following:
- Graham Cracker Crust: Best for fillings that require minimal baking time. Easy to make and provides a crunchy base.
- Pastry Crust: Ideal for pies needing longer baking times. Offers a flaky texture but requires more skill and effort.
For this recipe, a graham cracker crust is perfect due to its simplicity and the tart’s short baking time.
Step-by-Step Instructions
Making the Perfect Crust
- Preheat the Oven: Set your oven to 350°F.
- Prepare the Graham Crackers: Grind the graham crackers in a food processor or crush by hand.
- Mix with Butter: Combine the crumbs with melted butter and mix well.
- Form the Crust: Press the mixture into a nonstick tart pan with a removable bottom. Freeze for 10 minutes.
Crafting the Creamy Lemon Filling
- Whisk the Ingredients: In a bowl, whisk together heavy whipping cream and lemon juice until thickened.
- Add Condensed Milk: Incorporate the condensed milk and mix until smooth.
- Pour and Bake: Pour the filling into the tart shell and bake for 10 minutes. Allow to cool.
Adding the Finishing Touch
- Prepare the Jell-O: Mix the Lemon Jell-O powder with warm water until dissolved.
- Pour Over Tart: Pour the Jell-O mixture over the cooled tart.
- Decorate: Add lemon slices and mint leaves for a beautiful finish.
- Chill: Refrigerate for at least four hours before serving.
Tips for Success
Use Fresh Ingredients
Whenever possible, use fresh ingredients. Freshly squeezed lemon juice and high-quality mint leaves elevate the tart’s flavor and presentation.
Don’t Rush the Chilling Process
Allowing the tart to chill for at least four hours ensures the Jell-O sets properly and the flavors meld together beautifully.
Experiment with Flavors
Feel free to experiment. Try substituting lime for lemon or adding a layer of raspberry Jell-O for a different twist.
Why Jell-O topping?
Gelatin has long been used as a thickening agent in fruit pies. When used as an additional Jell-O layer it becomes so much more. The Jell-O provides a textural contrast with the creamy filling and graham cracker crust. It also provides its own lemon flavor, which will enhance the citric notes of this dessert.
A Jell-O topping is also beautiful to look at, especially once decorated. The binding nature of the gelatin helps to hold the shape of your tart, even once sliced. Just remember to search for a vegan Jell-O mix if you or someone you’re cooking for has that dietary restriction.
Why use a graham cracker crust instead of a pastry crust?
When it comes to tarts and pies, there are two basic types of crust to choose from: pastry and crumb. A pastry crust is formed from a dough which can be formed into a shell for your tart. A crumb crust is made with premade ingredients, such as cookies, graham crackers, or maybe nuts that have been crushed into crumbs, mixed with melted fat and pressed into your pie pan to form a shell.
While equally delicious, both types of crust excel in different uses and can’t always be exchanged. A pastry crust is best for any pie or tart that requires a relatively long baking time, generally exceeding 25 minutes, such as fruit pies. Crumb crusts are very easy to make and best for fillings that require little to no baking, such as set custards. For these reasons, we’re using a crumb crust for this recipe.
What to serve with lemon tart?
A lemon tart is a fantastic way to end a nice dinner, be it to impress your guests at your next house party or a simple Sunday meal. The flavors go particularly well with a heavy meal as the lemons provide an acidic counterpoint.
I’d recommend a complimentary meal including roasted leg of lamb and vegetables, mac and cheese, or even fried rice. You can serve the tart itself with a scoop of vanilla ice cream, whipped cream, salted caramel sauce, or even maple syrup.
I’d love to hear from you if you made this lemon tart for. Come back and let us know!
Conclusion
Creating a gluten-free lemon tart that’s both delicious and visually stunning doesn’t have to be complicated. By following this recipe, you’ll impress your friends and family with a refreshing dessert that’s perfect for any occasion.
Ready to start baking? Gather your ingredients and get started. And for more delicious gluten-free recipes, check out our other blog posts. Happy baking!
I’d love to hear from you if you made this lemon tart for. Come back and let us know!
How to make an amazing Gluten Free Lemon Tart
Description
Craving something sweet and tangy? Our delicious and easy lemon tart is a must-try! With its zesty lemon flavor and buttery crust, this dessert will delight your taste buds and impress your guests. Bake it today!
Ingredients
Instructions
- Preheat the oven at 350°F.
- Grind graham crackers either in a food processor or crush them by hand in a ziploc bag.
- In a bowl add your graham cracker crumbs and melted butter. Mix well and transfer to a nonstick fluted tart pan with a removable bottom. Spread the mix evenly and press to the edges and bottom to form a stable crust.
- Place it in the freezer for 10 minutes.
- In another bowl add heavy whipping cream and lemon. Whisk until thickens for about 6 minutes, then add the condensed milk and whisk until incorporated.
- Pour the filling mixture inside the tart shell and spread the mix evenly. Be sure to leave space for the Jell-O top.
- Put the pie in the oven for 10 minutes, then set aside to cool.
- After 1 hour, in a new bowl pour the lemon Jell-O powder and mix in 1/3 cup of warm water until the sugar dissolves.
- Pour over the cooled tart and decorate with the sliced lemons, and mint.
- Leave it in the fridge for at least four hours before slicing and enjoy.
Nutrition Facts
Click on a star to rate it!
Average rating 0 / 5. Vote count: 0
No votes so far! Be the first to rate this post.


